

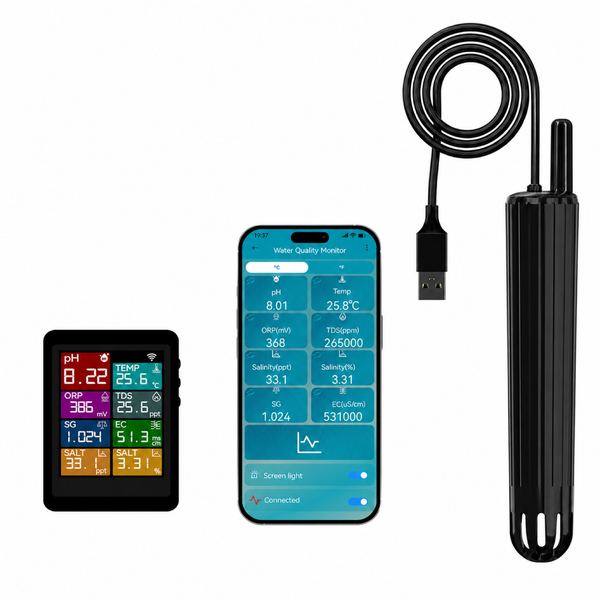
Model: 10.0 Series · SKU: RVN-WQ7-WIFI
Product: 7-in-1 WiFi Water Quality Monitor with App Alerts
English online edition: 2.0 · Updated October 8, 2026
Quick Start · WiFi Setup · Calibration · Troubleshooting
Quick start and your first reading
- Confirm that you have the 10.0 Series / RVN-WQ7-WIFI wireless probe and display.
- Unscrew the probe's sealed protective cap counterclockwise. Empty the protective liquid and clean the probe before installation. See Probe preparation.
- Secure the probe with its bracket or floating foam. Respect the marked maximum water level, choose slow-moving representative water, and avoid trapped bubbles.
- Power the display through its Type-C power port using the supplied power components. The manual specifies 5 V / 1 A for the display. Keep the display and power connections dry.
- Check that probe readings appear. The probe and display are paired at the factory. If the connection indicator stays on or readings are missing, follow Wireless probe connection.
- Connect the display to Tuya Smart and 2.4 GHz WiFi using the steps below.
The probe is factory calibrated. Check the initial readings and units after installation; use the model-specific calibration procedure when verification shows a discrepancy.
First-reading checklist
- The sealed protective cap has been removed.
- The sensing end is in the water and the marked maximum immersion level is respected.
- The display receives probe data and remains dry.
- The units match those used by your reference instrument.
- Readings have stabilized before comparison or adjustment.
- Available app alerts are configured for your application after you establish its normal variation.
Your device and measurement units
This model monitors seven conditions: pH, water temperature, ORP, TDS, electrical conductivity (EC), salinity, and specific gravity (SG).
The display has eight measurement tiles because salinity is shown in both ppt and %. These are two displays of salinity, not two additional measured conditions. This model does not measure free chlorine.

Read the parameter and its unit together
- TDS: the unit switches between ppm and ppt as the range changes.
- EC: the unit switches between µS/cm and mS/cm as the range changes.
- Salinity: use the SALT tile and its ppt or % unit.
- Specific gravity: read the SG tile; it is shown without a concentration unit.
- ORP: the unit is mV.
Do not use the TDS tile as a salinity reading merely because both can display ppt. Check the parameter label before comparing instruments or setting an alert.
Display measurement ranges
| Parameter | Range in the supplied manual | Displayed unit |
|---|---|---|
| pH | 0-14 | pH |
| Water temperature | 0-60 °C / 32-140 °F | °C or °F |
| TDS | 0-999 ppm / 1.00-200 ppt | ppm or ppt |
| EC | 0-999 µS/cm / 1.00-400 mS/cm | µS/cm or mS/cm |
| Salinity, ppt display | 0.1-200.0 ppt | ppt |
| Salinity, % display | 0.01-25.00% | % |
| Specific gravity | 1.000-1.222 | SG, no unit |
| ORP | -999 to +999 mV | mV |
These display ranges are reproduced from the supplied 10.0 Series manual. The two salinity display limits are stated separately in that manual. Measurement ranges do not specify permitted ambient operating or storage temperatures; ask Rovynel Support for limits for your hardware revision.
Dimensions and display power
- Display: 68 × 100 × 16 mm.
- Probe body: 165 mm long, approximately 32 mm wide at the top and 28 mm at the lower end.
- Antenna: 30 mm, shown separately from the probe body in the source drawing.
- Display power: Type-C connection, 5 V / 1 A.
Buttons and screen indicators
The three controls are identified by their icons. The source instructions call them the left, middle, and right buttons in the order shown below; use the icons if you hold the display in a different orientation.

| Control | Icon and source name | Main operations |
|---|---|---|
| Confirm | Check mark; left button | Confirm a menu option or calibration reading; hold 3 seconds to turn off the screen light. |
| Cycle | Circular arrows; middle button | Enter settings or move through options; hold 3 seconds for WiFi pairing. |
| Return | Back arrow; right button | Hold 3 seconds to remove the app connection. |
Adjustment screens: follow the on-screen - / OK / + labels. The source procedure uses the left and right controls to change the value and the middle control to save it.
Connection indicators
- Probe connection indicator: the main operating instructions use an asterisk, *. A continuously displayed indicator means the probe connection is interrupted. An occasional appearance is described as normal.
- WiFi icon: a flashing icon indicates that the display is not connected to WiFi.
Check the probe link when display readings are missing. Check WiFi near the display when the app is offline but the display still shows readings.
Prepare and install the probe and display
Remove the sealed protective cap
The probe ships with a sealed protective cap containing protective liquid, described in the source as usually saturated potassium chloride. Salt-like crystals can appear as that liquid crystallizes.
- Unscrew the sealed cap counterclockwise.
- Empty the protective liquid and clean the probe.
- Keep the cap for storage. Install the probe for measurement with the sensing end exposed as shown.

Probe placement and water level
- Use the supplied bracket or floating foam to secure the probe. Fit the mounting part from the bottom of the probe as shown in the source.
- Place the sensing end in representative water with slow flow. Avoid locations with trapped air bubbles or direct chemical dosing.
- Do not immerse the probe beyond its marked maximum water-level line. Keep the antenna above the water.
- Keep the display within a usable wireless connection distance from the probe. Check that readings continue to arrive after moving either part.

The red line in the cap-removal illustration identifies the cap area; use the actual probe's marked immersion limit when setting installation depth.
Mount the display
- Remove the adhesive backing film.
- Attach the bracket to a suitable smooth surface.
- Attach the other bracket part to the back or side of the display.
- Slide the display down the bracket track until it is secured at the bottom.

The display is not waterproof. Position it away from splashes and keep the Type-C power connection dry.
Wireless probe-to-display connection
There are two separate connections: the probe sends measurements wirelessly to the display, and the display connects to the Tuya app through WiFi. WiFi coverage is needed near the display.
The probe and display are paired at the factory. A persistent probe connection indicator or missing readings can be caused by excessive distance, a probe that is switched off, or a display reset that cleared the pairing.
Reconnect the probe after a lost pairing
- Check that the display has power and the probe is switched on. Bring them closer together to check whether distance is the cause.
- If the pairing was cleared, read the factory-reset consequences before proceeding.
- Restore the display's factory settings using Reset > YES, then keep the display powered on.
- Switch the probe off and back on using its power control.
- Check that probe readings return. If the connection remains interrupted, contact support with the model, revision, and indicator shown.
A factory reset is part of the source re-pairing procedure. It is not the first step for every missing or unstable reading.
Connect to Tuya Smart and 2.4 GHz WiFi
Use the Tuya Smart app account to connect the monitor. Your Rovynel store account and your Tuya app account serve different purposes.
- Download Tuya Smart to your phone.
- Allow the access requested for device setup.
- Read and agree to the app terms.
- Log in or register a Tuya app account.
- Select Add Device.
- Select Continue when prompted.
- Complete the additional access prompts needed for device pairing.
- Power on the display.
- Press and hold Cycle, the middle button, for 3 seconds, then release it. The display beeps 3 times to indicate network pairing.
- Select the detected Water Monitor in the app.
- Enter your 2.4 GHz WiFi network details and select Next.
- Wait for connection to finish and check that the app shows monitor readings.


These are example screens from the supplied manual. App labels, displayed device names, and permission prompts can vary with the app, phone, and device revision.
Review app readings and alerts
After connection, compare the app's readings and units with the display. Review the alert options available for your device in Tuya and choose thresholds appropriate to your aquarium or water system. Record the initial baseline before relying on alerts.
Daily operation, app unlinking, and reset
Turn the screen light off or on
Press and hold Confirm for 3 seconds to turn off the screen light. A short press of any of the three buttons turns it back on. Turning off the screen light does not affect data collection or analysis.
Switch Celsius and Fahrenheit
- Press Cycle to enter settings.
- Use Cycle to select Temp-set, then press Confirm.
- Use Confirm to choose Celsius or Fahrenheit under Units.
Remove the current app connection
Press and hold Return for 3 seconds, then release it. This removes the monitor's app connection so that it can be connected to another phone. The source states that this method does not delete historical data records. Follow the WiFi setup steps to connect again.
Factory reset
A factory reset deletes data and requires the wireless probe to be paired again. This differs from removing the app connection. Do not reset the display simply to correct a reading; check placement, units, and calibration first.
- Press Cycle to enter settings.
- Use Cycle to select Reset.
- Select YES only if you intend to restore factory settings.
- Keep the display powered and follow Reconnect the probe.
- Check the app connection, units, and settings after the reset.
Calibration and measurement adjustment
Use fresh, correctly labeled standards and allow readings to stabilize. Record the reference, units, date, and result. Do not use a desired aquarium target as a calibration reference.
Prepare pH calibration solutions
- Prepare three separate containers of purified water. The source procedure uses 250 mL in each container; check the dilution instructions on the supplied powders before mixing.
- Dissolve each calibration powder completely in its own container. The preparation section lists pH 4.0, 6.86, and 9.18.
- Remove the protective cap from the probe.
Buffer label check: the calibration menu and operating steps use pH 4.01 for the first point, while the powder preparation section says 4.0. Confirm that your standard and device revision match before starting.
Three-point pH calibration
Menu: pH-set > pH-CAL-3. The source recommends three-point calibration and shows the sequence 4.01 > 6.86 > 9.18.

- Press Cycle to enter settings.
- Select pH-set with Confirm.
- Use Cycle to select pH-CAL-3, then press Confirm. The pH 4.01 calibration screen appears.
- Place the sensing end in the matching pH 4.01 solution. The display shows the current measurement.
- Move the probe gently to ensure contact with the solution. Wait for the reading to stabilize, then press Confirm.
- When the pH 6.86 screen appears, rinse the probe in neutral or purified water and remove residual liquid before moving to the next standard.
- Place it in pH 6.86 solution, move it gently, wait for a stable reading, and press Confirm.
- When the pH 9.18 screen appears, rinse the probe again and remove residual liquid.
- Place it in pH 9.18 solution, move it gently, wait for a stable reading, and press Confirm.
- Clean the probe after calibration, reinstall it, and check the readings.
The source also mentions two-point calibration, but does not identify the omitted point in its written procedure. Use the full three-point procedure above for the menu shown.
pH reading adjustment
Use an adjustment only after checking a suitable reference. The adjustment changes the measurement compensation; it does not replace a check of probe condition or calibration.

- Press Cycle to enter settings, then select pH-set with Confirm.
- Use Cycle to select pH-Adj, then press Confirm.
- The adjustment screen shows a compensation value, initially 0.
- Use the controls corresponding to - and + to change the value. Press the middle control for OK to save.
Three-point EC calibration
Menu: EC-set > EC-CAL. The written procedure specifies 1413 µS/cm, 12.88 mS/cm, and 111.3 mS/cm.
Check the unit: the source menu drawing labels the last two points differently from the written procedure. Match both the value and unit on the standard and your actual device screen. If they disagree, ask support before calibrating.
- Press Cycle to enter settings and navigate to EC-set.
- Navigate to EC-CAL, then press Confirm. The 1413 µS/cm screen appears.
- Place the sensing end in the 1413 µS/cm solution.
- Move the probe gently, wait for a stable reading, and press Confirm.
- When the 12.88 mS/cm screen appears, rinse the probe in neutral or purified water and remove residual liquid.
- Place it in 12.88 mS/cm solution, wait for the reading to stabilize, and press Confirm.
- When the 111.3 mS/cm screen appears, rinse the probe again and remove residual liquid.
- Place it in 111.3 mS/cm solution, wait for the reading to stabilize, and press Confirm.
- Clean the probe after calibration, reinstall it, and verify the readings.
EC reading adjustment
- Press Cycle to enter settings.
- Select EC-set with Confirm.
- Use Cycle to select EC-Adj, then press Confirm.
- Use the controls shown as - / + to change the compensation. Press the middle control for OK to save.
TDS, salinity, and specific gravity
The source states that EC calibration also calibrates the linked TDS, salinity, and SG readings. It does not provide separate calibration-standard sequences for these parameters.
TDS adjustment: enter settings with Cycle, choose EC-set with Confirm, navigate to TDS-Adj with Cycle, then press Confirm. Change the compensation using - / + and save with the middle OK control.
The EC-set menu also shows SAL-Adj and SG-Adj. For revision-specific salinity or SG adjustment, use the matching 10.0 Series video guide or ask support for the confirmed procedure.
Use a reference specified for the parameter, unit, and temperature when checking salinity or SG. Ask support for an approved reference before preparing a homemade calibration mixture.
Temperature reading compensation
- Press Cycle to enter settings.
- Navigate to Temp-set, then press Confirm.
- Use Cycle to select Com, then press Confirm.
- Use - / + to change the compensation against your reference. Press the middle OK control to save.
ORP settings
The main menu includes ORP-set, but the supplied manual does not give an ORP calibration procedure. Contact Rovynel Support for instructions for your revision if the ORP reading needs investigation.
Cleaning, maintenance, and storage
Routine care
- Check for algae, deposits, trapped bubbles, and signs of probe damage.
- Rinse the probe after handling calibration solutions and inspect it before reinstalling it.
- Keep the display, power supply, and non-immersible connections dry.
- The source recommends routine pH calibration every 4-6 months. Check sooner if a reference comparison shows a discrepancy.
- Record cleaning, calibration, and unusual exposure in a maintenance log.
For stubborn algae or deposits, ask support for the cleaning agent, concentration, exposure time, and handling method approved for your probe revision before chemical cleaning.
Long-term storage
Keep the protective cap and maintain the sensing end moist during extended storage. Ask support for the storage liquid and quantity for your probe revision before putting the probe away. Inspect it and verify readings before returning it to service.
Water exposure and temperature
- The display is not waterproof; avoid water entering the housing or Type-C connection.
- Respect the maximum immersion mark on the probe.
- Disconnect power before servicing power connections.
- Inspect a probe that shows persistently low or unstable pH for visible damage.
- Check revision-specific operating and storage temperatures before outdoor or cold-weather use. The measurement range table does not establish these limits.
Troubleshooting
| Symptom | What to check |
|---|---|
| No probe readings or persistent connection indicator | Check probe power, display power, distance, and obstacles. If pairing was cleared, follow the reconnect procedure and read the reset consequences first. |
| App offline while the display has readings | Check the display's WiFi icon, 2.4 GHz network, coverage near the display, and app connection. |
| Device not found during app setup | Check required phone permissions. Hold Cycle for 3 seconds and release; listen for 3 beeps, then retry Add Device. |
| Screen dark | Short-press any control to wake the screen light. If it does not wake, check the display power connection. |
| Readings jump or differ from a reference | Check immersion, bubbles, deposits, stabilization, units, and the condition of the reference before calibration or adjustment. |
| pH remains low or unstable | Inspect for probe damage and check the pH standards and calibration. Provide photos and observed values to support if the issue remains. |
| Salinity or SG differs from another instrument | Confirm the parameter, unit, reference conditions, and EC calibration. Check that you are reading SALT or SG rather than TDS. |
| Connection lost after factory reset | Keep the display powered and switch the probe off and on to pair again. Check WiFi and app settings afterward. |
| Frequent app alerts | Review normal variation and the alert units and thresholds for your application after confirming the measurements. |
Videos, support, and your device record
Matching videos and related guides
- Watch the 10.0 Series pH, salinity, and specific gravity calibration videos
- Setup and calibration overview
- Sensor accuracy and probe care
- Water quality parameters guide
- Frequently asked questions
- Rovynel warranty and support
Contact Rovynel Support about the 10.0 Series
For assistance, include the model and SKU, order number, hardware or firmware revision if shown, observed readings and units, display and probe installation photos, and the reference and date of the last calibration.
Download this manual: select Download PDF Manual at the top of the web guide. The PDF is generated from the current web content. A new download includes changes made to this edition; an already downloaded file does not update automatically. Use Print / Save as PDF as an alternative.
English online edition 2.0. Model-specific instructions and diagrams were reorganized from the supplied 10.0 Series English manual, file version EN20250625. App screens are illustrative. For a different hardware revision or an unexpected menu or unit, contact Rovynel Support.