

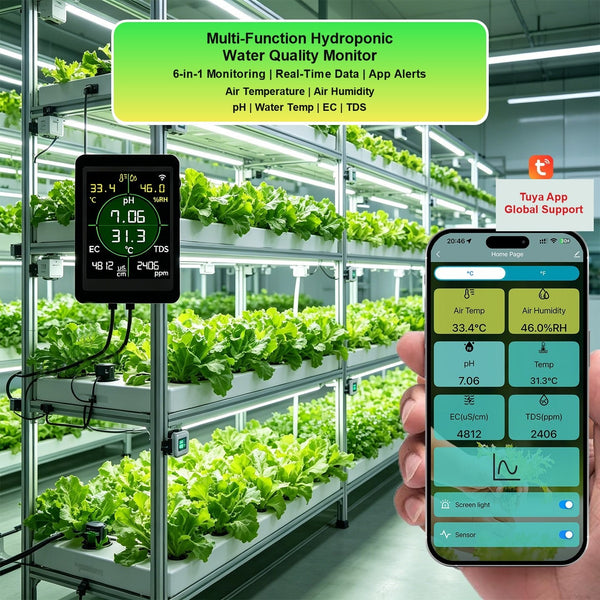
Model: HY485 · Product: Rovynel 6-in-1 Hydroponic Water Quality Monitor
English online edition: 2.0 · Updated October 8, 2026
Your device
HY485 monitors six conditions: air temperature, air humidity, water pH, water temperature, electrical conductivity (EC), and total dissolved solids (TDS).
Three display modes
- The air screen shows ambient temperature and humidity.
- The water screen shows pH, water temperature, EC, and TDS.
- The combined screen shows both air and water measurements.
You can switch freely between the three screens. HY485 does not provide ORP, salinity, specific gravity, or free-chlorine measurements.

Measuring ranges
| Parameter | Range | Resolution | Accuracy |
|---|---|---|---|
| pH | 0–14 | 0.01 | ±0.05 |
| Water temperature (°C) | 0–60 °C | 0.1 | ±0.1 |
| Water temperature (°F) | 32–140 °F | 0.5 | ±0.1 |
| TDS | 0–999 ppm 1.00–200 ppt |
1 ppm 1 ppt |
±5% F.S. |
| EC | 0–999 µS/cm 1.00–400 mS/cm |
1 µS/cm 1 mS/cm |
±5% F.S. |
| Air temperature | −40–125 °C −40–257 °F |
0.1 | Not specified |
| Air humidity | 0–100% RH | 0.1 | Not specified |
These values are reproduced from the supplied HY485 manual. F.S. means full scale. Air temperature and air humidity accuracy are not stated in its table.
Controls, connections and power
The three controls are Confirm (check mark), Cycle (circular arrow), and Return (back arrow). The operating instructions call these the left, middle, and right buttons respectively; match the icons when holding the display in a different orientation.
A blinking Wi-Fi indicator means the display is not connected. The display has two Type-C ports; either can be used for the supplied power connection or probe connection. Use the original power plug.

Setup and first reading
Connect the components
- Connect the original power plug to the display power cable.
- Connect the Type-C extension cable to the temperature and humidity probe and the water-quality probe. Their connection order does not matter.
- Connect the power-cable assembly and probe-cable assembly to the display.
- Plug the original power plug into a suitable power strip. The display lights up and shows measurements.

Place the probes
- Unscrew and remove the protective cap from the water-quality probe before measurement.
- Place the water-quality probe in the hydroponic reservoir or fish tank. Use the supplied buckle bracket or floating foam, or secure it to suit the installation.
- Keep the immersion depth below the maximum water-level mark on the probe.
- Place the temperature and humidity probe in the air where you want to measure ambient conditions. Fix it with cable ties if needed. Do not immerse this probe in water.
The product is pre-calibrated at the factory and can be installed and used directly.

First-reading checklist
- The protective cap is removed from the water probe.
- The air probe remains out of the water.
- The water-level mark is respected.
- The display and both probes are connected using the supplied components.
- Measurements appear on the display; readings normally update every 5 seconds.
Mount the display
- Remove the adhesive backing film.
- Attach the bracket to a smooth surface.
- Attach the other bracket part to the back of the display.
- Slide the display down the bracket track until it is secured at the bottom.

Connect to Tuya Smart and Wi-Fi
- Download the Tuya Smart app.
- Allow the app access required for setup.
- Read and agree to the app terms.
- Log in or register an app account.
- Select Add Device.
- Select Continue when prompted.
- Complete any additional access prompts required for device pairing.
- Power on the HY485 display.
- Press and hold the Cycle (middle) button for 3 seconds, then release it. The display beeps 3 times to indicate network pairing.
- Select the detected HY485 water monitor in the app.
- Enter the details for your 2.4 GHz Wi-Fi network and select Next.
- Wait for pairing to finish. The app then displays the monitor readings.
App labels and permission prompts can vary with the phone and app version.


Display and basic operation
Display-to-probe communication
The display and probe communicate through the RS485 protocol. Communication begins when the probe is connected to the display. Data is transmitted every 5 seconds, so display readings update at that interval.
If no probe data arrives for 15 seconds, the display shows “*” as an abnormal communication alert. If this continues for more than 1 minute, check the probe-to-display connection for a disconnected or faulty connection.
Turn the screen light off or on
Press and hold Confirm for 3 seconds to turn off the screen light. A short press of any of the three buttons turns it back on. Turning the screen light off does not affect data collection or analysis.
Switch display mode
Press and hold Return for 1 second, then release it. Repeat to switch between the three screens.
Switch temperature units
- Press Cycle to enter the settings menu.
- Use Cycle to select Temp-set, then confirm with Confirm.
- Use Confirm to choose Celsius or Fahrenheit.
Factory reset
Do not restore factory settings during normal use. If measurements seem inaccurate, check calibration first.
- Press Cycle to enter the settings menu.
- Use Cycle to select Reset, then choose YES.
If you are unsure whether a reset is appropriate, contact support first.
Calibration and measurement adjustment
Before pH calibration
- Prepare three separate glasses, each containing 250 mL of purified water. Do not use mineral or tap water to prepare calibration solutions.
- Completely dissolve each supplied calibration powder in its own glass. The preparation instructions list pH 4.0, 6.86, and 9.18.
- Remove the protective cover from the water-quality probe.
Buffer label note: The first calibration screen is labeled pH 4.01, while the preparation instructions label the first powder pH 4.0. Check the supplied standard's instructions and your device revision if the labels differ.
Three-point pH calibration
Menu path: pH-set → pH-CAL-3 → 4.01 → 6.86 → 9.18
- Press Cycle to enter the settings menu.
- Press Confirm to select pH-set.
- Use Cycle to select pH-CAL-3, then press Confirm. The pH 4.01 calibration screen appears.
- Place the probe in the pH 4.01 calibration solution. The displayed value is the current measurement.
- Gently move the probe so it contacts the solution fully. Wait for the reading to stabilize, then press Confirm.
- When the pH 6.86 screen appears, clean the probe with neutral or purified water and remove the remaining liquid as instructed for the probe.
- Place the probe in the pH 6.86 solution. Move it gently, wait for a stable reading, then press Confirm.
- When the pH 9.18 screen appears, clean the probe again and remove the remaining liquid.
- Place the probe in the pH 9.18 solution. Move it gently, wait for a stable reading, then press Confirm.
- Clean the probe thoroughly after calibration.
pH adjustment
Menu path: pH-set → pH-Adj
- Press Cycle to enter the settings menu, then press Confirm to select pH-set.
- Use Cycle to select pH-Adj, then press Confirm.
- The pH adjustment screen appears with a default compensation value of 0.
- Use the left or right buttons, matching the − / + controls on screen, to decrease or increase the value. Press Cycle to save.
The displayed measurement reflects the testing result.
Three-point EC calibration
Menu path: EC-set → EC-CAL → 1413 µS/cm → 12.88 mS/cm → 111.3 mS/cm
- Press Cycle to enter the settings menu, then use it to select EC-set.
- Select EC-CAL with Cycle, then press Confirm. The 1413 µS/cm screen appears.
- Place the probe in the 1413 µS/cm solution. The displayed value is the current measurement.
- Move the probe gently to ensure contact with the solution. Wait for a stable reading, then press Confirm.
- When the 12.88 mS/cm screen appears, clean the probe with neutral or purified water and remove the remaining liquid.
- Place the probe in the 12.88 mS/cm solution, move it gently, wait for a stable reading, then press Confirm.
- When the 111.3 mS/cm screen appears, clean the probe again and remove the remaining liquid.
- Place the probe in the 111.3 mS/cm solution, move it gently, wait for a stable reading, then press Confirm.
- Clean the probe thoroughly after calibration.
EC adjustment
Menu path: EC-set → EC-Adj
- Press Cycle to enter the settings menu.
- Use Cycle to select EC-set, then press Confirm.
- Use Cycle to select EC-Adj, then press Confirm.
- Use the left or right buttons, matching − / +, to adjust the value. Press Cycle to save.
TDS calibration and adjustment
TDS is calibrated together with EC. A separate TDS calibration is not performed.
Adjustment menu path: EC-set → TDS-Adj
- Press Cycle to enter the settings menu.
- Use Cycle to select EC-set, then press Confirm.
- Use Cycle to select TDS-Adj, then press Confirm.
- Use the left or right buttons, matching − / +, to adjust the value. Press Cycle to save.
Temperature adjustment
Menu path: Temp-set → Com
- Press Cycle to enter the settings menu.
- Use Cycle to select Temp-set, then press Confirm.
- Use Cycle to select Com, then press Confirm.
- Use the left or right buttons, matching − / +, to adjust the compensation value. Press Cycle to save.
Routine care and storage
Keep the water-probe cap for storage. The supplied HY485 manual says that, for extended non-use, a small amount of tap water may be placed in the cap before refitting it to keep the electrode moist. Follow the instructions for the supplied probe and its revision; do not apply another probe's storage procedure.
- Inspect probes, cable connections, and deposits regularly.
- Keep the display, power plug, and non-immersible connectors dry.
- Keep the air probe out of water.
- Check calibration when readings seem inaccurate instead of using a factory reset as a routine fix.
Troubleshooting
| Symptom | What to check |
|---|---|
| Display shows “*” | No probe data has arrived for 15 seconds. Check the Type-C probe connection; an alert continuing beyond 1 minute indicates lost communication. |
| Screen light is off | Press any of the three buttons briefly. Data collection continues when the light is off. |
| App is offline or Wi-Fi icon blinks | Check power and 2.4 GHz Wi-Fi. Hold Cycle for 3 seconds and follow the pairing steps again if needed. |
| Measurements seem inaccurate | Check installation and probe condition, then use the corresponding calibration or adjustment procedure. Avoid a routine factory reset. |
| TDS differs from another meter | Compare EC first and check whether both meters use the same TDS conversion factor. |
Safe use and limitations
- Use the original power plug and supplied connections.
- Do not immerse the air temperature and humidity probe.
- Do not immerse the water probe beyond its marked maximum level.
- Disconnect power before servicing cables and connectors.
- Do not use the monitor as the sole basis for drinking-water, medical, life-support, food-safety, or emergency decisions.
- Use crop- and growth-stage-specific targets when reviewing nutrient readings.
Support and your device record
For assistance, provide your HY485 model and hardware revision, order number, observed readings and units, installation photos, and the most recent calibration standards and date.
Contact Rovynel Support about HY485
Videos and related guides
- Watch the HY485 setup and pH calibration videos
- Setup and calibration overview
- Sensor accuracy and probe care
- Frequently asked questions
- Warranty and support
English online edition 2.0. Device-specific operating instructions and diagrams were reorganized from the supplied HY485 English manual (file version EN20260702). General support and care guidance has been retained from the existing online guide. PDF downloads are generated from this web edition.